Intro
As promised in the previous blog post, let’s see how to create a VM, starting from a template, and using Cloud-Init to configure basic settings at the first run.
What’s Cloud-Init?
Cloud-Init is a powerful tool for automating the initial configuration of virtual machines (VMs) in cloud environments. It is designed to customize a VM when it first boots by executing scripts and applying configurations based on user-supplied metadata. This enables dynamic provisioning of instances without manual intervention.
When a VM starts, Cloud-Init reads predefined configuration data, usually provided via a metadata service or directly through cloud images. With Cloud-Init, you can set up user accounts, install packages, configure networking, and more, making it an essential component for deploying infrastructure as code.
Create VM from template using the web interface
In Proxmox, creating a VM starting from a template is quite easy.
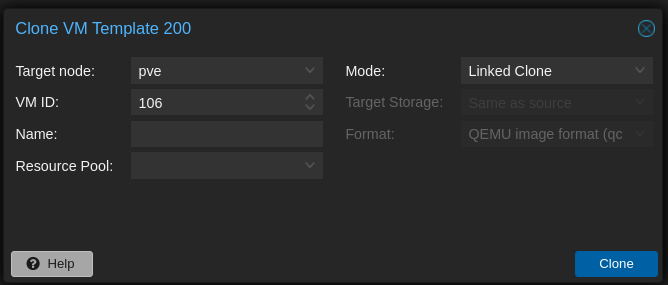
On the left bar, where all the VMs and containers are listed, locate the template you want to use as a base for your new VM, right click on it and then click on Clone.
You then need to input a few settings:
- Target Proxmox node. If you have a single node setup there is not much choice :)
- VM ID. If you have a pattern/convention on assigning ID to your computing resources, this where you do it.
- Name of the VM you want to create
- Resource Pool. This is optional, depends whether you are using or not resource pool
- Cloning Mode. If you followed the previous post on how to create template, here you can choose only Full Mode, so that the template disk will be fully copied in a new one.
The VM is now a thing, but it’s not yet ready to be started. There are still some things that needs to be adjusted.
First you want to resize the disk.
- On the left panel click on the VM
- On the VM setting list click on
Hardware, then click on the disk you want to resize and then on top click onDisk Action->Resize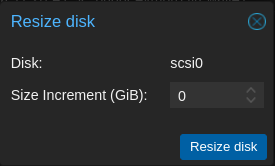
Now it’s time to create the Cloud-Init drive. Proxmox uses an ISO, mounted to a virtual drive to pass Cloud-Init define settings.
- On the left panel click on the VM
- On the VM setting list click on
Hardware, then click on the disk you want to resize and then on top click onAdd->Cloud Init Drive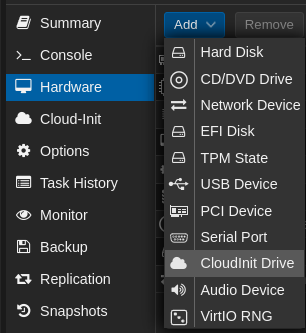
- Choose the drive where you want to store the Cloud-Init iso that will be used by this VM.
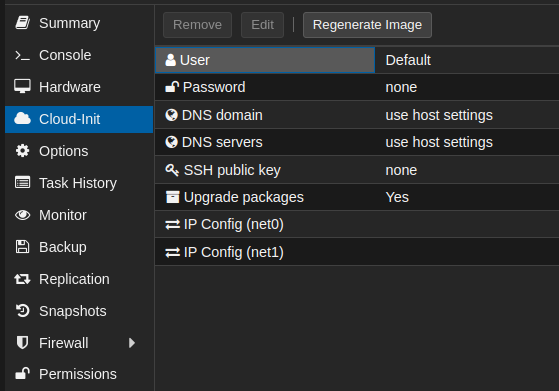
Cloud-Init drive is now ready and you can set configuration parameters such use user, password, ssh keys and network config.
- On the left panel click on the VM
- On the VM setting list click on
Hardware, then click on the disk you want to resize and then on top click onCloud-Init - On the new screen you can set:
- Username, related password and ssh authorized keys
- DNS search domain and DNS servers
- Wether to upgrade installed packages or not
- The network configuration (Static IP/DHCP) for each network interface
The VM is now ready to be powered on. On the first boot, Cloud-Init daemon will parse the configuration settings you defined in the previous step and it will apply them to the OS.
After the machine boots, you are able to SSH into it pointing at the ip and using the credentials specified in the cloud init config.
If you paid attention, you saw that there is no way to specify the hostname in Cloud-Init. The hostname will be the VM name.
Create VM from template using terraform
If you want to use the IaC approach or if you need to deploy a more complex configuration over Cloud-Init you can terraform.
I personally have tried only the bgp/proxmox provider and it works fine. The documentation can be found here.\
Skipping the steps needed to configure terraform, which by the way are quite simple, you need to create 3 different resources: a local_file to get the public key you want
to use to ssh into the VM, a proxmox_virtual_environment_file where you write the Cloud-Init configuration and a proxmox_virtual_environment_vm where you define the VM details.
Be careful that the the the network configuration is done out of the snippet, within the initialization section.\
Be sure to have at least one storage that is configured to store Snippets. In order to check that:
- Click on
storageon the right menu bar - Check the column
contentfor each storage and see if there isSnippets - If not, you can click on the storage where you want to store the
Snippetsand then click theEditbutton on the top - On the drop down menu next to
Contentclick onSnippetsand then onOkbutton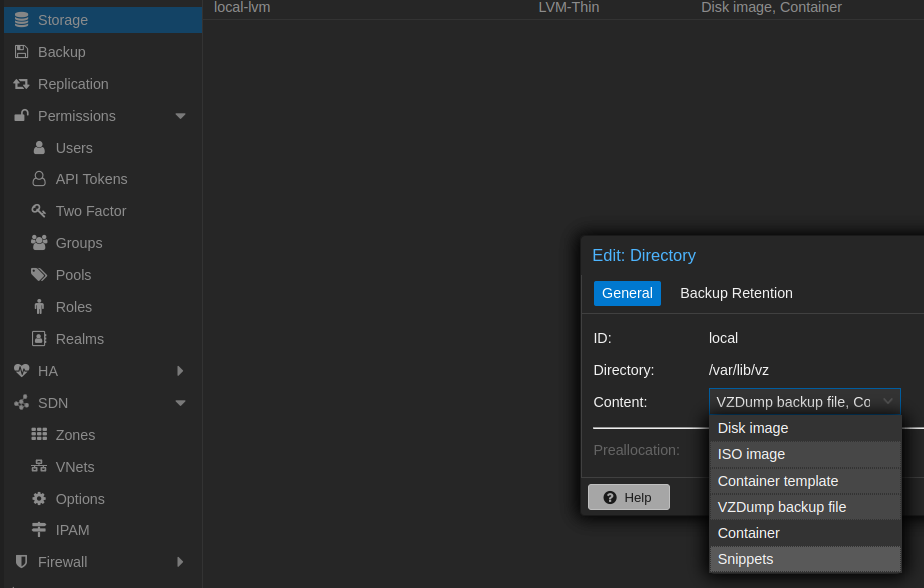
Terraform code
# Get the ssh key from a local file
data "local_file" "ssh_public_key" {
  filename = "./id_rsa.pub"
}


resource "proxmox_virtual_environment_file" "cloud_config" {
  content_type = "snippets"
  datastore_id = "<datastore-name>"
  node_name    = "<vm-name>"

  source_raw {
    data = <<-EOF
    #cloud-config
    users:
      - default
      - name: ubuntu
        groups:
          - sudo
        shell: /bin/bash
        ssh_authorized_keys:
          - ${trimspace(data.local_file.ssh_public_key.content)} # this is needed to remove any trailing character
        sudo: ALL=(ALL) NOPASSWD:ALL
    runcmd:
        - apt update
        - apt install -y qemu-guest-agent net-tools
        - timedatectl set-timezone America/Toronto
        - systemctl enable qemu-guest-agent
        - systemctl start qemu-guest-agent
        - echo "done" > /tmp/cloud-config.done
    EOF

    file_name = "cloud-config.yaml"
  }
}


resource "proxmox_virtual_environment_vm" "vm-name" {
    name = "<vm-name>"
    description = "Managed by Terraform"
    node_name = "<proxmox-node-name>"

    # Set QEMU agent enable
    agent {
        enabled = true
    }

    # Specify the template you want to clone
    clone {
        datastore_id = "<storage-name>"
        vm_id = <template-id>
    }

    # Set VM CPU details
    cpu {
        cores = 2
        type = "x86-64-v2-AES"
        units = 100
    }

    # Set VM storage details. You can add one or more disk section for more virtual HDD
    disk {
      datastore_id = "<storage-name>"
      interface = "scsi0"
      size = 20
      file_format = "raw"
    }

    # Set the VM NIC. You can add one or more network_device section for more NICs
    network_device {
        bridge = "<bridge-name>"
    }

    # Set VM ram
    memory {
        dedicated = 2048
    }

  # Set Cloud-Init data
  initialization {
    ip_config {
      ipv4 {
        address = "dhcp"
      }
    }
    # the proxmox_virtual_environment_file resource you created above
    user_data_file_id = proxmox_virtual_environment_file.cloud_config.id
  }
}